As an Amazon Associate I earn from qualifying purchases.
In the realm of kitchen appliances, rice cookers stand out for their convenience and the comfort of the meals they help prepare. However, like all electrical appliances, they are not immune to wear and tear, and one common issue users might encounter is a damaged power cord. A frayed or malfunctioning power cord not only poses a significant safety risk but can also render your trusted rice cooker unusable. Understanding how to safely replace a damaged power cord is crucial for ensuring the continued enjoyment of perfectly cooked rice while maintaining safety in the kitchen.
This article will guide you through the process of identifying signs of cord damage, selecting the right replacement cord, and the steps to safely replace the power cord on your rice cooker. Whether you’re a seasoned DIY enthusiast or a novice willing to tackle basic appliance repairs, this guide aims to equip you with the knowledge and confidence needed to address one of the most common issues that can affect your rice cooker’s performance and safety. From preparing the workspace to testing the appliance post-repair, we’ll cover all the necessary precautions and detailed instructions to ensure a successful repair, keeping safety as the paramount concern.
Importance of a Functional Power Cord
A functional power cord is essential for several reasons, ranging from ensuring the reliable operation of electronic devices to maintaining safety standards. Here’s why a functional power cord is so important:
- Power Supply: The most obvious reason is that power cords are necessary for supplying electricity to electronic devices. Without a functional power cord, devices such as computers, televisions, and kitchen appliances cannot operate.
- Safety: A functional power cord is designed to safely conduct electricity from the power outlet to the device. A damaged or improperly designed power cord can lead to electrical fires, electrocution, or damage to the device itself. Manufacturers adhere to strict standards (like those set by Underwriters Laboratories (UL) in the United States) to ensure their cords are safe to use.
- Efficiency and Reliability: Quality power cords are designed to efficiently transmit electricity without significant power loss. This efficiency ensures that devices operate correctly and reliably. A malfunctioning or low-quality power cord can lead to inefficient power usage, increased electricity bills, or erratic device performance.
- Device Protection: Functional power cords often include features like surge protection, which safeguards devices against sudden spikes in electrical voltage. This protection is crucial for preserving the lifespan of sensitive electronics.
- Compliance and Legal Requirements: In many jurisdictions, using certified power cords is a legal requirement for businesses and sometimes even in residential settings. These regulations ensure that all electrical products meet minimum safety standards, reducing the risk of accidents.
- Environmental Considerations: Properly functioning power cords, especially those designed to minimize energy waste, contribute to environmental conservation efforts by reducing unnecessary power consumption.
- Economic Impact: For businesses, a malfunctioning power cord can lead to downtime, affecting productivity and profitability. Ensuring that all power cords are functional and up to standard helps avoid these costly interruptions.
In summary, a functional power cord plays a critical role in the safe, efficient, and reliable operation of electronic devices, while also adhering to legal standards and contributing to environmental sustainability. Ensuring your power cords are in good working condition is a small but crucial step in protecting your devices, your safety, and the environment.
Assessing the Damage
Assessing the damage to and safely replacing a damaged power cord on your rice cooker involves several steps, aimed at ensuring your safety and the proper functioning of the appliance. Here’s a guide on how to go about it:
1. Assessing the Damage
- Visual Inspection: Unplug the rice cooker and examine the power cord for visible signs of damage, such as fraying, cuts, exposed wires, or burn marks. Also, check the plug and the entry point where the cord meets the appliance.
- Check for Functionality Issues: If the cord appears intact but you suspect damage (perhaps due to intermittent power supply or sparking), the issue might be internal and requires further investigation.
2. Safety Precautions
- Unplug the Appliance: Always ensure the rice cooker is unplugged from the electrical outlet before attempting any repairs.
- Avoid Water Exposure: Ensure the appliance and cord are completely dry to avoid the risk of electric shock.
3. Determine If It’s Replaceable
- Consult the Manual: Check the rice cooker’s user manual to see if it recommends replacing the power cord. Some models have cords that are not intended to be user-replaceable.
- Check for Compatibility: If replacement is recommended, ensure you obtain a power cord that matches the specifications required by the rice cooker (voltage, amperage, and connector type).
4. Replacing the Power Cord
- DIY Replacement: If you have the necessary skills, tools, and the replacement is straightforward (e.g., the cord plugs into the back of the rice cooker without the need for disassembly), you can proceed with caution.
- Turn off all power sources.
- Remove the damaged cord and replace it with the new one, ensuring all connections are secure and correct.
- Professional Help: If the cord is hardwired into the appliance, requires disassembly of the rice cooker, or if you’re unsure about the process, it’s safer to seek professional help. Contacting the manufacturer’s customer service or a professional appliance repair service is advisable.
5. Testing the Appliance
- Once the new cord is in place, plug in the rice cooker and monitor its performance. Ensure it operates as expected without any signs of malfunctioning. Do this test in a safe environment, ready to unplug the device should anything go awry.
6. Disposal of the Damaged Cord
- Properly dispose of the damaged power cord to prevent any misuse or accidental use. Follow local regulations for disposing of electronic waste.
Safety Note
- It’s crucial to prioritize safety over convenience. If there’s any doubt about the condition of the power cord or your ability to replace it safely, opting for professional repair services or considering a replacement rice cooker might be the best course of action. Remember, dealing with electrical appliances carries inherent risks, and safety precautions should always be taken seriously.
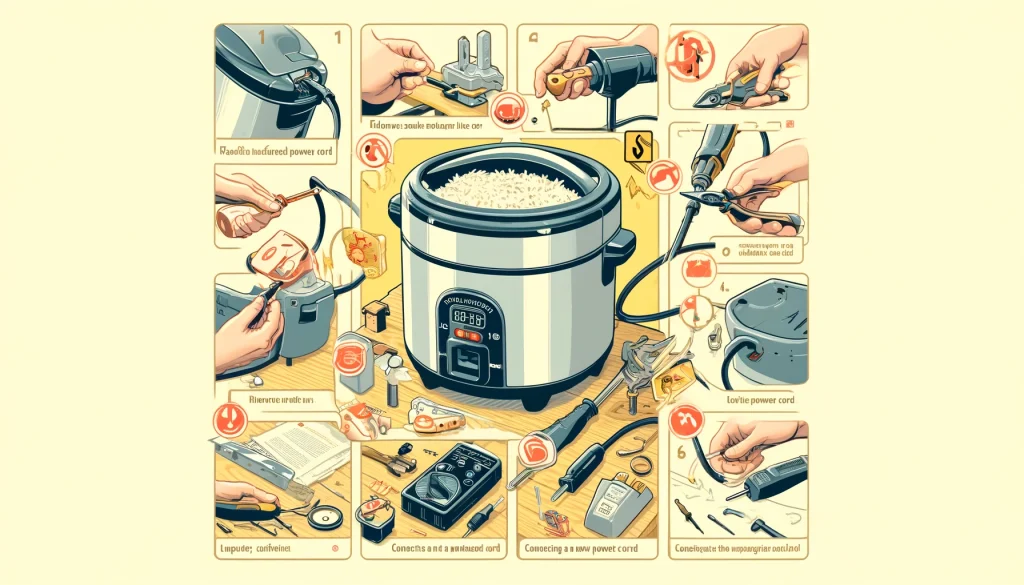
Steps to Replace the Power Cord
Replacing a damaged power cord on your rice cooker involves a careful process to ensure safety and the proper functioning of the appliance afterward. Here’s a step-by-step guide, but remember, if the process requires disassembling the appliance or dealing with complex wiring and you’re not confident in doing so, it’s safer and recommended to seek professional help.
Step 1: Safety First
- Unplug the rice cooker from the electrical outlet to avoid any risk of electric shock.
- Ensure the appliance is cool and dry before starting the replacement process.
Step 2: Assess the Situation
- Determine whether the power cord is user-replaceable. Consult the user manual or manufacturer’s website for guidance. Some rice cookers have cords that can easily be unplugged and replaced without tools, while others might be integrated into the unit.
Step 3: Gather Required Tools and Parts
- If the power cord is replaceable, purchase a compatible power cord. Ensure it matches the specifications (voltage, amperage) required by your rice cooker.
- Gather any tools you might need for the replacement, such as a screwdriver, if the rice cooker needs to be opened.
Step 4: Access the Power Cord Connection
- For rice cookers with detachable cords, simply unplug the old cord from the appliance and skip to
Step 6.
- If the cord is attached to the rice cooker, remove any external casing or panels to access the point where the cord connects to the appliance. This step might require removing screws or clips.
Step 5: Remove the Damaged Power Cord
- Once you have access, note how the cord is connected. Taking a photo can help ensure you reconnect the new cord correctly.
- Disconnect the old cord. This might involve unscrewing terminals, unclipping a connector, or cutting wires if you’re preparing to use wire nuts or soldering for reattachment.
Step 6: Install the New Power Cord
- Connect the new power cord following the method used for the old cord. If you’re soldering or using wire nuts, ensure a secure and insulated connection.
- Double-check your work to make sure the new cord is connected exactly as the old one was.
Step 7: Reassemble the Rice Cooker
- Once the new cord is securely attached, carefully reassemble any parts of the rice cooker that were removed. Ensure everything fits back together as it was and that there are no loose parts or screws.
Step 8: Test the Rice Cooker
- Plug in the rice cooker and test it in a safe environment, away from water or any flammable materials. Look for any signs of malfunction or unusual behavior.
- Initially, monitor the appliance closely to ensure it operates normally and the new cord does not overheat or show any signs of distress.
Step 9: Dispose of the Old Power Cord
- Properly dispose of the damaged power cord to avoid any potential misuse or hazards. Follow local regulations for disposing of electronic waste.
Important Notes
- Safety Check: If you’re not comfortable or familiar with electrical repairs, or if the repair process seems complex, it’s best to consult with or hire a professional.
- Warranty Consideration: Before proceeding with a DIY repair, check if your rice cooker is still under warranty. Unauthorized repairs might void the warranty.
This guide is for informational purposes and focuses on safety and general procedures. The exact steps may vary based on the specific model of your rice cooker and the nature of the power cord attachment.
Installing the New Cord
Installing a new power cord on your rice cooker, if done with careful attention to safety and detail, can restore your appliance to proper working condition. Here’s how you can proceed with installing the new cord, emphasizing safety and effectiveness throughout the process:
1. Preparation
- Safety First: Ensure the rice cooker is unplugged and completely cool.
- Workspace: Choose a clean, dry, and well-lit area to work in.
- Tools and Materials: Have your new power cord ready, along with any tools you might need for the installation, such as screwdrivers or wire strippers. Ensure the replacement cord matches the voltage and amperage specifications of your rice cooker.
2. Accessing the Connection Point
- If your rice cooker’s power cord is designed to be user-replaceable (e.g., with a detachable plug), simply proceed to connect the new cord as per the appliance’s design.
- For rice cookers where the cord is internally connected, you may need to open the appliance’s casing. Use a screwdriver to remove screws or panels, carefully noting their original positions for reassembly. Be mindful of any seals or clips that might be involved.
3. Removing the Old Cord
- Once you have access to the area where the power cord is attached, take a moment to observe and note (or photograph) how the cord is connected. This will be invaluable when installing the new cord.
- If the cord is screwed into terminals, loosen them and remove the old cord. If it’s soldered or uses wire connectors, you might need to cut the old cord and prepare the wires of the new cord accordingly.
4. Preparing the New Cord
- If not already prepared, strip the insulation from the end of the new power cord’s wires to expose the bare wire. Typically, about half an inch (approximately 1.27 cm) is enough, but this can depend on the connection type.
- If your rice cooker uses terminals, twist the strands of the stripped wire tightly so they can be easily inserted into the terminal screws or connectors.
5. Installing the New Cord
- Attach the new cord in the same manner as the old one was connected. If it was screwed into place, insert the stripped wire ends under the terminal screws and tighten securely. Ensure that the connections are firm and there is no loose wire.
- If your model requires soldering or using wire nuts (in cases where direct wiring is involved), make sure the connections are secure and insulated to prevent any short circuits or hazards.
6. Reassembly and Testing
- Carefully reassemble any parts of the rice cooker that were removed, making sure everything fits back into place as it should.
- Once reassembled, plug in the rice cooker and test it with a small amount of water to ensure it heats up properly and that the new cord is functioning as expected. Do this test in a safe environment, and be ready to unplug the device if anything seems amiss.
7. Safety Checks
- Keep an eye on the new cord during and after the first few uses to ensure there’s no excessive heat, which could indicate a poor connection, and that the appliance operates as it should without any electrical issues.
Important Considerations
- Compatibility: Ensure the replacement cord is fully compatible with your rice cooker in terms of power requirements and connector type.
- Warranty: Check if your rice cooker is under warranty before attempting a repair, as self-repairs may void the warranty.
- Professional Help: If at any point you feel unsure or unsafe about performing the repair, it’s best to seek the assistance of a professional appliance repair service.
Replacing a damaged power cord with attention to these details can help you safely and effectively restore your rice cooker to proper functioning.
Testing the Replacement
Testing the replacement power cord on your rice cooker is a critical step to ensure the safety and functionality of your appliance after a repair. Here’s how to conduct this test properly:
Step 1: Visual Inspection
- Before plugging in the rice cooker, inspect the new installation. Make sure the power cord is securely attached, with no loose connections or exposed wires.
- Ensure the appliance is reassembled correctly, with all parts fitting snugly and no tools or spare parts left inside.
Step 2: Prepare for Testing
- Place the rice cooker on a stable, dry surface away from any flammable materials. Keep water and other liquids away from the electrical outlet and the rice cooker’s electrical components.
Step 3: Plug It In
- Plug the rice cooker into a grounded electrical outlet. Ideally, use an outlet that’s equipped with a Ground Fault Circuit Interrupter (GFCI) for additional safety.
Step 4: Perform a Dry Run
- Without adding any ingredients or water, turn on the rice cooker. The idea is to check for basic electrical functionality and to ensure the repair hasn’t introduced any new issues.
- Observe the rice cooker for a few minutes. You’re checking for any unusual sounds, smells, or smoke that could indicate a problem.
Step 5: Test with Water
- If the dry run is successful, turn off the rice cooker and unplug it. Then, add a small amount of water inside the cooking pot—enough to cover the bottom.
- Plug the rice cooker back in and turn it on to boil the water. This test helps verify that the appliance can perform its basic function without overheating or malfunctioning.
Step 6: Monitor the Cord
- During both tests, periodically check the power cord and the plug to ensure they are not getting excessively hot. A slight warmth is normal, but they shouldn’t become too hot to touch.
Step 7: Final Inspection
- After testing, unplug the rice cooker and allow it to cool down. Conduct a final inspection to ensure everything is still properly connected and that there were no issues during testing.
Safety Tips
- Stay Present: Never leave the rice cooker unattended while testing.
- Be Prepared: Have a fire extinguisher or baking soda nearby in case of an electrical fire. Do not use water to extinguish an electrical fire.
- Professional Advice: If you notice any issues during testing, such as sparking, unusual noises, or overheating, unplug the appliance immediately and consult a professional. It’s possible that the repair may not have been successful, or there might be other underlying issues with the rice cooker.
Testing the replacement power cord is an essential step to ensure your rice cooker is safe to use and operates correctly. If the appliance passes these tests without any issues, it’s a good indicator that the repair was successful and the rice cooker is ready for normal use. However, always prioritize safety and seek professional help if you’re uncertain about any part of the process.
Safety Tips for Using the Rice Cooker
Using a rice cooker can make cooking more convenient and consistent, but like any appliance that uses electricity and heat, it’s important to follow safety guidelines to prevent accidents or damage. Here are some essential safety tips for using your rice cooker:
1. Read the Manual
- Before using your rice cooker for the first time, read the manufacturer’s manual. It contains specific instructions and safety information for your particular model.
2. Inspect Before Use
- Check the rice cooker and its cord for any signs of damage or wear before each use. Do not use the appliance if it appears damaged.
3. Use on a Stable, Heat-Resistant Surface
- Place your rice cooker on a stable, flat surface away from any flammable materials. Ensure the surface is heat-resistant to avoid damage.
4. Do Not Overfill
- Follow the manufacturer’s instructions regarding the maximum capacity of your rice cooker. Overfilling it can cause spillage and may lead to malfunction or injury.
5. Keep Lid Closed
- Keep the lid closed while the rice cooker is in operation to prevent steam burns and ensure even cooking.
6. Avoid Contact with Steam
- Be cautious of steam vents when the rice cooker is on. Direct contact with steam can cause burns. Open the lid away from your face and hands to avoid steam exposure.
7. Use Proper Utensils
- Use utensils that are safe for use with your rice cooker, typically those that are non-metallic to avoid scratching non-stick surfaces or causing short circuits.
8. Unplug When Not in Use
- Unplug the rice cooker when not in use, especially if you’re leaving the house. This reduces the risk of fire or electrical issues.
9. Do Not Immerse in Water
- Never immerse the rice cooker’s base, cord, or plug in water or any other liquid. This can damage the appliance and pose a serious electrical hazard.
10. Regular Cleaning
- Ensure the rice cooker is unplugged and cooled down before cleaning. Follow the manufacturer’s guidelines for cleaning to avoid damaging the appliance.
11. Store Safely
- When not in use, store your rice cooker in a dry place where it won’t be damaged. Keep it out of reach of children if possible.
12. Supervision Around Children
- Always supervise the rice cooker when in use around children to prevent accidents.
13. Handle Repairs Cautiously
- If your rice cooker needs repairs, especially to its electrical components, consider professional services unless you are skilled in appliance repair. DIY repairs can be dangerous and might void warranties.
By following these safety tips, you can enjoy the convenience of your rice cooker while minimizing the risk of accidents or damage. Safety should always be a priority when operating kitchen appliances.
Frequently Asked Questions (FAQ)
Below are some expertise-level questions and answers related to safely replacing a damaged power cord on your rice cooker, aimed at ensuring a comprehensive understanding and safe execution of the task.
Q: What are the signs that indicate a rice cooker’s power cord needs replacement?
A: Signs indicating the need for a power cord replacement include visible damage such as fraying, cuts, or exposed wires; a burnt smell or scorch marks near the plug or appliance entry point; intermittent power to the appliance suggesting a loose connection; and any evidence of short circuits or electrical sparking when plugged in. Additionally, if the cord becomes unusually hot during use, it may also indicate an internal problem requiring replacement.
Q: Is it safe to replace a rice cooker’s power cord on my own, or should I seek professional help?
A: It depends on your level of electrical knowledge and skill. If the power cord is designed to be easily replaced by the user (e.g., detachable cords) and you have a direct replacement, it’s generally safe to do so following the manufacturer’s instructions. However, if the cord is hardwired into the rice cooker, involves disassembly of the appliance, or if you’re unsure about the process, seeking professional help is safer and recommended to avoid potential hazards.
Q: What safety precautions should I take when replacing a damaged power cord on a rice cooker?
A: Safety precautions include unplugging the appliance and ensuring it’s completely cool before starting, working in a dry area away from water sources to avoid electrical shock, using the correct tools and replacement parts specified by the manufacturer, and wearing protective gear if necessary (e.g., safety gloves). It’s also important to ensure that the appliance is not plugged in until the replacement has been completed and checked for safety.
Q: How do I ensure the replacement power cord is compatible with my rice cooker?
A: Compatibility can be ensured by checking the specifications required by your rice cooker, such as voltage, amperage, and the type of connector. These specifications are usually found in the rice cooker’s user manual or on a label on the appliance. The replacement cord should match these specifications. Additionally, purchasing cords that are recommended by the manufacturer or designed specifically for your rice cooker model can ensure compatibility.
Q: What are the steps to safely connect the new power cord if the rice cooker requires disassembly?
A: If disassembly is required:
Document and Label: Take photos and label parts as you disassemble to ensure proper reassembly.
Accessing the Connection Point: Carefully open the appliance to access the area where the power cord is connected, using the appropriate tools.
Removing the Old Cord: Disconnect the old cord, noting its connection points and method (e.g., screws, soldered connections).
Preparing the New Cord: Strip the wire ends of the new cord if necessary, matching the length of exposed wire to the original cord’s.
Connecting the New Cord: Attach the new cord using the same method as the old cord was connected. Ensure solid and secure connections.
Testing Before Reassembly: If possible, conduct a safety test of the connection before fully reassembling the appliance to ensure it’s correctly installed.
Reassembly: Carefully reassemble the appliance, ensuring no parts are left out and that the appliance is restored to its original state.
Q: How can I test the rice cooker after replacing the power cord to ensure it’s safe to use?
A: After replacing the power cord:
Visual Inspection: Ensure there are no loose connections or exposed wires.
Plug In and Test: Plug the appliance into a GFCI outlet and turn it on without adding food to check for proper operation. Observe for any unusual noises, smells, or malfunctioning.
Monitor the Cord: Check that the new power cord does not become excessively hot to the touch during operation.
Functionality Test: Cook a small amount of rice as a final test to ensure the cooker is operating correctly and safely.
Q: What should I do if I encounter problems during or after the replacement process?
A: If you encounter problems during the replacement, such as difficulty in connecting the new cord or the appliance not functioning correctly after replacement, immediately unplug the appliance and seek professional help. Do not attempt to force the appliance to work, as this could pose safety hazards. A professional repair service can safely diagnose and fix the issue.
By understanding these aspects and following safety protocols, you can ensure a safe and effective replacement of your rice cooker’s power cord.
Conclusion
Concluding our journey through the essential task of safely replacing a damaged power cord on your rice cooker, we’ve navigated through the signs of wear and tear, the selection of an appropriate replacement, and the meticulous steps necessary for a secure repair. This process not only revitalizes an indispensable kitchen appliance but also reinforces the importance of safety and maintenance in our daily routines.
Successfully completing such a repair underscores a broader theme of self-reliance and the empowerment derived from learning new skills. It’s a reminder of the value in taking the time to care for and maintain our belongings, extending their lifespan and ensuring they continue to serve us well. Moreover, it highlights the critical importance of safety in our interactions with everyday appliances, encouraging a proactive approach to identifying and resolving potential hazards.
Remember, while DIY repairs can be satisfying and cost-effective, the priority should always be safety. If at any point you feel unsure or the task appears too complex, seeking professional help is the wisest choice. Not only does this ensure the longevity and proper functioning of your rice cooker, but it also guarantees peace of mind, knowing that the repair has been executed safely and effectively.
In embracing the challenge of replacing a damaged power cord, you’ve not only learned a valuable skill but also taken a significant step towards creating a safer, more sustainable home environment. As we continue to navigate the world of home appliance maintenance, let us carry forward this spirit of cautious confidence, always prioritizing safety and precision in our endeavors.