Master the ultimate Persian rice cooker tahdig recipe! Learn step-by-step how to make perfectly crispy, golden rice with ease. A must-try dish!
As an Amazon Associate I earn from qualifying purchases.
Welcome to our comprehensive guide on the persian rice cooker tahdig recipe, brought to you by Expert Reviews Best Rice Cooker. In this article, we share a step-by-step approach to mastering one of Iran’s most cherished dishes—a perfectly crispy and golden tahdig that transforms any meal into a celebration. Whether you’re a seasoned chef or a kitchen novice, this persian rice cooker tahdig recipe will help you create an unforgettable culinary experience.
Most Recommended Premium Basmati Rice
For more detailed insights on selecting the right appliance to achieve that ideal crunch, check out our main article on the best persian rice cooker for consistently golden tahdig.
———
Table of Contents
———
…
Introduction to Tahdig and Its Cultural Significance
Tahdig, the iconic crispy layer of rice at the bottom of the pot, is much more than just a side dish—it’s a culinary treasure that evokes memories of family gatherings and festive celebrations. In traditional Persian cooking, tahdig symbolizes the art of patience and skill, achieved through careful attention and the right tools. Our persian rice cooker tahdig recipe takes this age-old tradition into the modern kitchen, combining authentic techniques with the convenience of a rice cooker.
Essential Ingredients and Tools
Before diving into the step-by-step guide, it’s important to gather all the necessary ingredients and tools. Here’s what you’ll need for this persian rice cooker tahdig recipe:
- Rice: Basmati rice is preferred for its long grains and delicate aroma.
- Water: For rinsing and boiling the rice.
- Saffron: Infused in hot water to add color and a subtle aroma.
- Yogurt or Butter: Optional, for extra richness in the tahdig layer.
- Salt: To season the rice perfectly.
- Olive or Vegetable Oil: To ensure a crispy tahdig crust.
- A Rice Cooker: Essential for simplifying the cooking process without sacrificing traditional flavor.
This persian rice cooker tahdig recipe is designed to be both accessible and foolproof, allowing you to replicate the crisp texture and vibrant taste of traditional tahdig using modern appliances.
Step 1: Preparing the Rice
- Rinse Thoroughly: Begin by rinsing the basmati rice under cold water until the water runs clear. This process removes excess starch and prevents the rice from clumping.
- Soak: Soak the rice for at least 30 minutes. Soaking not only softens the grains but also helps in achieving a fluffier texture once cooked.
- Parboil: Bring a pot of water to a boil, add salt, and cook the rice for about 5–7 minutes. The rice should be partially cooked; it will continue cooking in the rice cooker.
By following these preparatory steps, you lay a strong foundation for the perfect tahdig. This stage is crucial for ensuring that the grains remain separate and crisp during the later stages of the persian rice cooker tahdig recipe.
Step 2: Infusing Saffron for a Rich Aroma
Saffron is the secret behind the luxurious aroma and golden hue of tahdig. Here’s how to prepare it:
- Steep the Saffron: Crush a small pinch of saffron and add it to a tablespoon of hot water. Allow it to steep for about 10 minutes. This step intensifies the saffron’s flavor and ensures even color distribution in your dish.
- Mixing with Yogurt or Butter: For an extra layer of richness, blend the saffron water with a couple of tablespoons of yogurt or melted butter. This mixture will later be layered over the rice to form that irresistibly crisp crust.
Incorporating saffron early in the process guarantees that every bite of your persian rice cooker tahdig recipe is imbued with a subtle, yet distinct, flavor.
Step 3: Assembling in the Rice Cooker
Now that your rice is prepped and saffron is ready, it’s time to bring everything together in your rice cooker:
- Layering the Rice: Drain the parboiled rice and transfer it to your rice cooker. Drizzle a generous amount of oil over the rice to promote crisping.
- Creating the Tahdig Base: Gently spread the saffron-yogurt mixture over the rice, ensuring an even coating. This layer is what will transform into the crispy tahdig.
- Final Seasoning: Sprinkle a little more salt over the top if needed, and if you like, add a few small dollops of butter for additional flavor.
This meticulous assembly is key to achieving a beautifully golden crust, making your persian rice cooker tahdig recipe stand out from the rest.
Step 4: Cooking Process
With your ingredients perfectly layered, it’s time to cook:
- Set the Rice Cooker: Turn on your rice cooker and set it to the ‘cook’ function. The rice cooker’s controlled heat ensures that the bottom layer gradually transforms into the coveted tahdig.
- Monitor the Process: Although the rice cooker automates most of the process, keep an eye on it during the first few cycles to ensure that the heat is evenly distributed.
- Resting Period: Once the rice cooker signals that the cooking cycle is complete, allow the rice to rest for an additional 10 minutes. This resting phase helps in setting the crust firmly.
Following these steps in the persian rice cooker tahdig recipe ensures that the final product is a harmonious blend of soft, fluffy rice and a delectably crunchy tahdig.
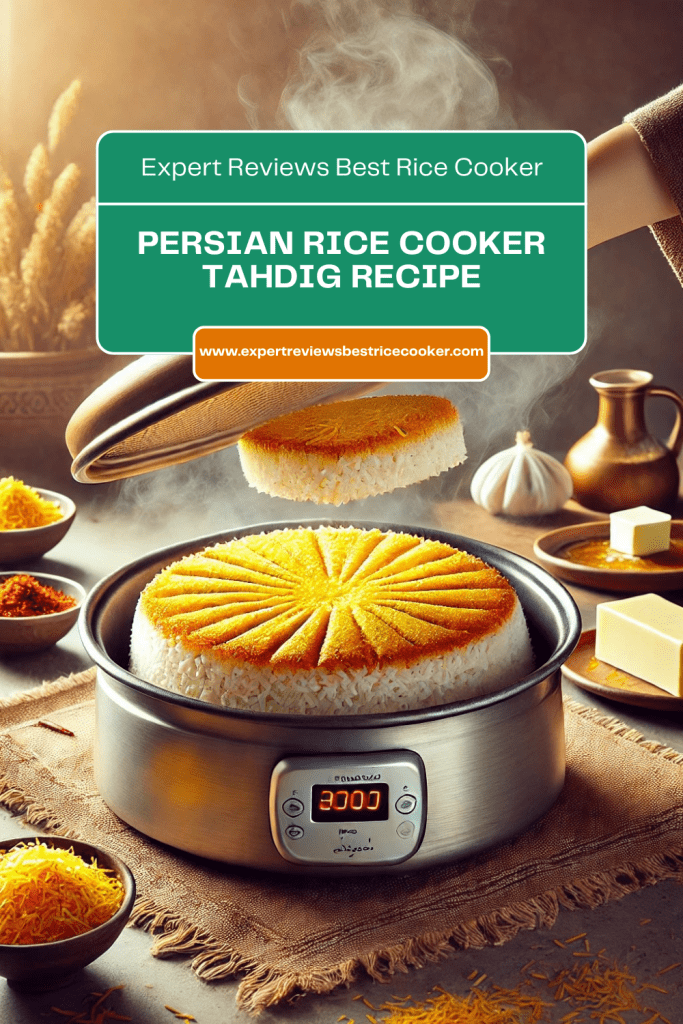
Step 5: Unveiling the Perfect Tahdig
The moment of truth arrives when you unveil your creation:
- Inversion Technique: To serve the tahdig, carefully invert the rice cooker or use a flat spatula to gently separate the crispy layer from the rest of the rice. This process might require a delicate touch, but the effort is well rewarded.
- Serving Presentation: Once extracted, the tahdig should appear as a single, golden disc. Serve it on a large platter, allowing the audience to appreciate the visual appeal before indulging in its delicious taste.
This final step in the persian rice cooker tahdig recipe is a testament to your culinary prowess—each slice of tahdig embodies the perfect balance of texture and flavor.
Tips and Tricks for Tahdig Perfection
Creating the perfect tahdig is both an art and a science. Here are some expert tips to help you refine your technique:
- Temperature Control: While rice cookers automate heat regulation, understanding your appliance’s behavior can help you achieve consistent results.
- Oil is Key: Do not skimp on oil. A generous coating is essential for the formation of a well-browned and crisp tahdig.
- Experiment with Flavors: Consider adding thin slices of potatoes or flatbread underneath the rice for an innovative twist. These variations can add extra texture and flavor to your persian rice cooker tahdig recipe.
- Patience is Vital: Allowing the tahdig to rest after cooking ensures that the crust remains intact and does not crumble when you serve it.
Embracing these practical tips will make your persian rice cooker tahdig recipe a standout dish at every dining table.
Bringing It All Together
The persian rice cooker tahdig recipe detailed in this guide encapsulates the beauty of traditional Persian cooking, modernized for convenience without compromising on flavor. With each step carefully explained—from preparation and saffron infusion to the critical layering process and the moment of unveiling—you now have the blueprint to create a masterpiece that marries heritage with innovation.
As you embark on this culinary adventure, remember that precision and passion are the secret ingredients. The crispy, golden tahdig isn’t just a dish—it’s a celebration of culinary art, an expression of culture, and a testament to the timeless appeal of Persian cuisine.
The Secret Ingredients to Perfect Recipes


Frequently Asked Questions (FAQ’s)
Question: What type of rice is best for making Persian Tahdig in a rice cooker?
Answer: The best type of rice for making Persian Tahdig is long-grain rice, specifically Basmati. It has the ideal starch content to produce fluffy grains while allowing a crispy crust to form at the bottom. Rinsing and soaking the rice before cooking helps remove excess starch and improves texture.
Question: How does the choice of oil or butter affect the crispiness of the Tahdig?
Answer: Using a combination of oil and butter creates the best texture for Tahdig. Oil helps achieve a golden, crispy crust, while butter adds rich flavor. Clarified butter (ghee) can also be used to enhance crispiness without burning too quickly.
Question: Why is parboiling the rice important before layering it in the rice cooker?
Answer: Parboiling removes excess starch, ensuring the rice remains fluffy and separate rather than sticky. It also partially cooks the rice, which allows for even steaming and prevents overcooking while the crust forms at the bottom.
Question: How can you tell when the Tahdig is ready in a rice cooker?
Answer: Tahdig is ready when you hear a gentle sizzling sound, and the sides of the crust begin to turn golden brown. The duration can vary depending on the rice cooker, but it typically takes 45 to 60 minutes. Letting the rice rest for a few minutes after cooking helps set the crust for easy release.
Question: What are common mistakes that can ruin Tahdig in a rice cooker?
Answer: Common mistakes include using too much water, which can make the rice soggy and prevent crust formation, not adding enough oil or butter, which results in a dry or uneven crust, and frequently opening the lid, which releases steam and interrupts the cooking process.
Question: How can you enhance the flavor of Tahdig?
Answer: For extra flavor, saffron-infused water can be drizzled over the rice before cooking. Adding a thin layer of yogurt mixed with egg yolk at the bottom creates a richer and more structured crust. Some variations also use thinly sliced potatoes or lavash bread as the base.
Question: What is the best way to remove the Tahdig intact from the rice cooker?
Answer: After cooking, let the rice sit for a few minutes with the lid off to allow steam to settle. Place a large plate over the rice cooker and carefully flip it over in one swift motion to release the Tahdig as a single, crisp layer.
Conclusion
In conclusion, we hope this persian rice cooker tahdig recipe has inspired you to explore the depths of Persian culinary traditions using modern tools. With the guidance of this step-by-step tutorial and the assurance of Expert Reviews Best Rice Cooker, you are now well-equipped to create an irresistible tahdig that dazzles in both appearance and taste. Embrace the challenge, refine your technique, and most importantly, enjoy every moment spent in the kitchen crafting this culinary masterpiece.